

New Front Panel USB-C Port Coming Soon!


Display. The event time (Item #1) may be displayed as a decimal number with six-digit resolution. The longest single-event timing interval is 999,999 hours. The highest resolution is 0.2 µs. The event time may also be displayed in HH.MM.SS clock format with 1 s resolution. The stopwatch display is updated during timing at a rate controlled by a gate time, up to 25/s. It is reset to zero when the next start pulse occurs. Accumulated time from multiple events (Item #2) is also tracked and may be displayed up to 999,999 hours.
The FR dual-channel signal conditioner board accepts inputs from proximity switches with a PNP or NPN output, TTL or CMOS logic, magnetic pickups, contact closures, and other signals from 12 mV to 250 Vac. Jumper selections provide optimum operation for different sensor types and noise conditions. A built-in (isolated) 5, 10, 12, or 24 Vdc excitation supply can power proximity switches and other sensors, and eliminate the need for an external power supply.
Extended DPM includes rate and total simultaneously, dynamic up-down counting, arithmetic functions applicable to channels A & B (A+B, A-B, A/B, AxB, A/B-1), phase angle, power factor, duty cycle, batch control, custom curve linearization.
Laureate Digital Panel Meters are easily programmed with Laurel’s free Instrument Setup Software, downloadable from our website and compatible with Windows PCs, requiring a data interface board for setup.
All signal conditioner board ranges are factory-calibrated, with calibration factors for each range securely stored in an onboard EEPROM. These factors can be scaled via software to accommodate external shunts, enabling field replacement of signal conditioner boards without necessitating recalibration of the associated digital panel meters. For optimal accuracy, factory recalibration is recommended annually. All Laurel Electronics instruments undergo factory calibration using the industry-leading Fluke calibrators, which are recalibrated yearly and certified traceable to national standards, ensuring the highest level of precision and reliability.
Peak and valley values are automatically captured. These may be displayed via a front panel pushbutton command or control signal at the rear connector, or be transmitted as serial data.
Two rear panel control Inputs (CMOS/TTL levels, logic 0 = tied to digital ground, logic 1 = open) or dry contacts that can be set to control / activate 14 meter commands.
An (isolated) 5, 10, 12, or 24 Vdc excitation output is standard to power transducers or two-wire transmitters. Ratiometric operation, which automatically compensates for changes in the applied excitation, is jumper selectable for applications, such as bridges, where the signal to be measured is proportional to the excitation level.
All boards are isolated from meter and power grounds. Optional Plug-in-Play boards for communications and control include Ethernet, WiFi, serial communication boards, dual or quad relay boards, and an analog output board. Laureates may be powered from 85-264 Vac or optionally from 12-32 Vac or 10-48 Vdc. The display is available with bright red or green 0.56" (14.2mm) high LED digits. The 1/8 DIN case meets NEMA 4X (IP65) specifications from the front when panel mounted. Any setup functions and front panel keys can be locked out for simplified usage and security. A built-in 5, 10, 12, or 24 Vdc excitation supply can power transducers, eliminating the need for an external power supply. All power and signal connections are via UL / VDE / CSA rated screw clamp plugs.

The design of the Laureate™ Series is modular for maximum flexibility at minimum cost. All boards are isolated from meter and power grounds. The base configuration for a panel meter or counter consists of a main module (with computer and plug-in display boards), a power supply board, and a signal conditioner board. Optional plug-in-play boards include an isolated setpoint controller board, an isolated analog output board, and an isolated digital interface board. Modular design and a choice of plug-in options allow the Laureate to be customized for a broad range of applications from simple monitoring to control and computer interface. There can be up to five plug-in boards in a 1/8 DIN Laureate.

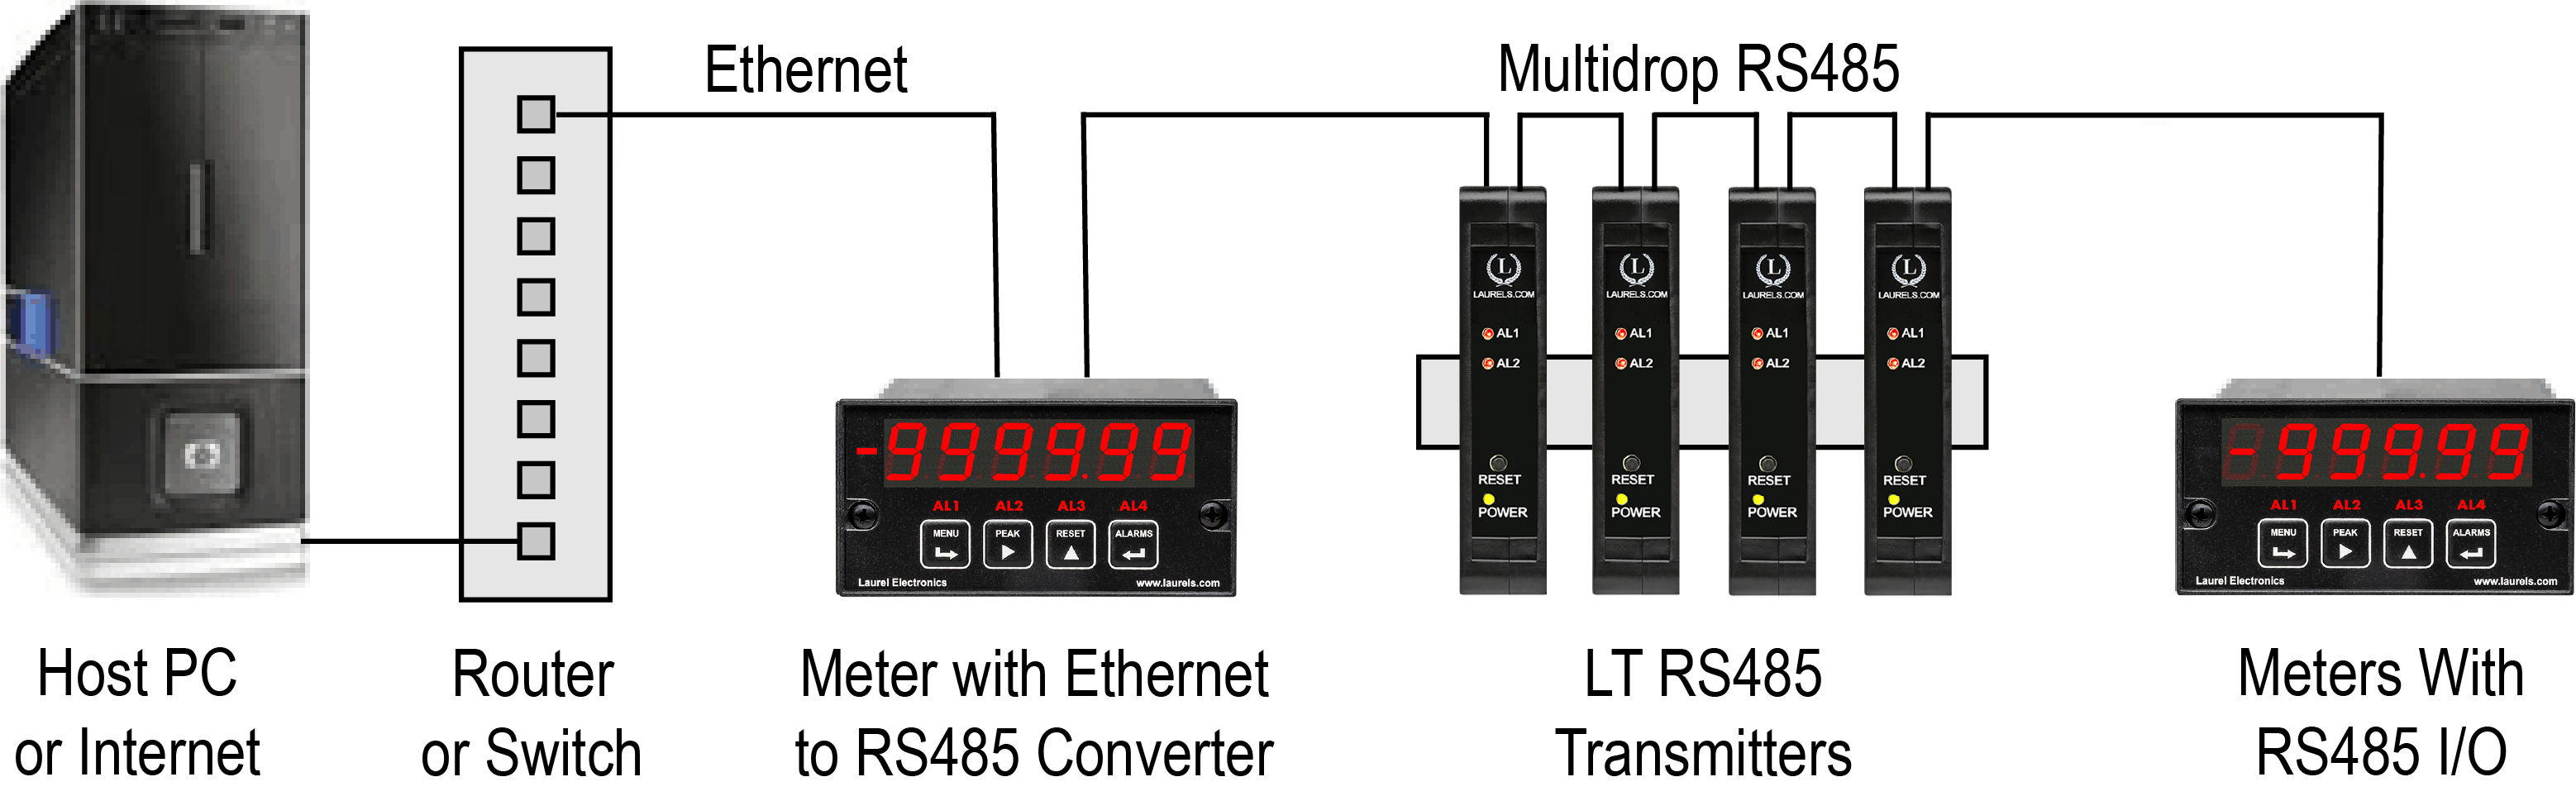
Up to 30 Laureate Digital Panel Meters and/or LT Transmitters can be configured for RS485 and daisy-chained to an LT Transmitter using Laurel’s High Speed Ethernet-to-RS485 converter board for seamless LAN integration. Alternatively, Laurel LTE series Ethernet transmitters can connect directly to a LAN via an Ethernet cable. Setup for both configurations is streamlined using Laurel’s free Instrument Setup Software, which simplifies node discovery and transmitter configuration.
Laureate Digital Panel Meters can be equipped with Laurel communication boards to support various interfaces and protocols. These include serial interfaces with ASCII or Modbus RTU protocols, and Ethernet interfaces with web access, ASCII, or Modbus TCP/IP protocols, ensuring versatile connectivity for your commercial applications.
| Display | |
|---|---|
| Readout | 6 LED digits, 7-segment, 14.2 mm (.56"), red or green. |
| Range | -999,999 to +999,999 |
| Indicators | Four LED lamps |
| Inputs | |
| Types | AC, pulses from NPN, PNP transistors, contact closures, magnetic pickups. |
| Grounding | Common ground for channels A & B |
| Minimum Signal | Nine ranges from (-12 to +12 mV) to (+1.25 to +2.1V). |
| Maximum Signal | 250 Vac |
| Noise Filter | 1 MHz, 30 kHz, 250 Hz (selectable) |
| Contact Debounce | 0, 3, 50 ms (selectable) |
| Recalibration: All ranges are calibrated at the factory. Recalibration is recommended every 12 months. | |
| Stopwatch Mode | |
| Timing Modes: | |
| With Ch A only | + to + edge, or - to - edge. |
| With Ch A tied to Ch B | + to - edge, or - to + edge. |
| With Ch A and Ch B | + edge of A to + edge of B, + edge of A to - edge of B, |
| - edge to A to - edge of B, - edge of A to - edge of B | |
| Timing Interval | 1 µs to 999,999 hrs |
| Timing Resolution | 0.2 µs to 1 hr |
| Selectable Decimal Time | 999999 H, M or S format with decimal point |
| Selectable Clock Time | HH.MM.SS format |
| Output & Display Update | 0 ms + programmable from 10 ms to 199.99 s |
| Accuracy | |
| Time Base | Crystal calibrated to ±2 ppm |
| Span Tempco | ±1 ppm/°C (typ) |
| Long-term Drift | ±5 ppm/year |
| Power Supply Boards (one required) | |
| Voltage, standard | 85-264 Vac or 90-300 Vdc |
| Voltage, optional | 12-32 Vac or 10-48 Vdc |
| Frequency | DC or 47-63 Hz |
| Power Isolation | 250V rms working, 2.3 kV rms per 1 min test |
| Excitation Output (standard) | |
| 5 Vdc | 5 Vdc ± 5%, 100 mA (jumper selectable) |
| 10 Vdc | 10 Vdc ± 5%, 120 mA (jumper selectable) |
| 12 Vdc | 12 Vdc ± 5%, 100 mA (jumper selectable) |
| 24 Vdc | 24 Vdc ± 5%, 50 mA (jumper selectable) |
| Output Isolation | 50 Vdc from signal ground |
| Analog Output Boards (one optional) | |
| Output levels | 4-20 mA, 0-20 mA, 0-10V, -10 to +10V (single-output option) |
| 4-20 mA, 0-20 mA, 0-10V (dual-output option) | |
| Current compliance | 2 mA at 10V ( > 5 kΩ load) |
| Voltage compliance | 12V at 20 mA (< 600 Ω load) |
| Scaling | Zero and full scale adjustable from -99999 to +99999 |
| Resolution | 16 bits (0.0015% of full scale) |
| Isolation | 250V rms working, 2.3 kV rms per 1 min test |
| (dual analog outputs share the same ground) | |
| Relay Output Boards (one optional) | |
| Dual magnetic relays | 2 Form C, 10A max, 440Vac or 125Vdc max, 2500VA or 300W |
| Quad magnetic relays | 4 Form A (NO), 10A max, 440Vac or 125Vdc max, 2500VA or 300W |
| Dual solid state relays | 2 Form A (NO), AC or DC, 0V - 400V, 120Ma, 35Ohms (max at On-State) |
| Quad solid state relays | 4 Form A (NO), AC or DC, 0V - 400V, 120Ma, 35Ohms (max at On-State) |
| Relay commons | Isolated commons for dual relays or each pair of quad relays |
| Relay isolation | 250V rms working, 2.3 kV rms per 1 minute test |
| Relay latching modes | Latching or non-latching |
| Relay active modes | Active on or off, active high or low |
| Hysteresis modes | QA passband mode, split hysteresis, span hysteresis |
| Communication Boards (one optional) | |
| Board selections | RS232, RS485 with dual RJ11 connectors, RS485 with dual RJ45 connectors, USB, Ethernet, USB-to-RS485 gateway, Ethernet-to-RS485 gateway, WiFi with built-in antenna plus USB & RS485, WiFi with external antenna plus USB & RS485 |
| Protocols | Modbus RTU, Modbus ASCII, Modbus TCP (Ethernet), Laurel ASCII |
| Data rates | 300 to 19200 baud |
| Isolation | 250V rms working, 2.3 kV rms per 1 min test |
| Environmental | |
| Operating temperature | -40°C to 70°C (-40°F to 158°F) |
| Storage temperature. | -40°C to 85°C (-40°F to 185°F) |
| Relative humidity | 95% at 40°C, non-condensing |
| Protection | NEMA-4X (IP-65) when panel mounted |
| Electrical Connections | |
 |
|
| Mechanical | |
| Enclosure | 1/8 DIN, high impact plastic, UL 94V-0, color: black |
| Mounting | 1/8 DIN panel cutout required: 3.622" x 1.772" (92 mm x 45 mm). |
| Dimensions | 4.68" x 2.45" x 5.64" (119 mm x 62 mm x 143 mm) (W x H x D) |
| Maximum panel thickness | 4.5 mm (0.18") |
| Tightening Torque - Connectors | Screw terminal connectors: 5 lb-in (0.56 Nm) |
| Tightening Torque - Pawls | Digital Panel Meter Case Pawls: 5 lb-in (0.56 Nm) |
| Weight of base meter | 210 g (7.4 oz) typical (DPM, counter, timer, 6-digit remote display) |
| Weight of option boards | 30 g (1.0 oz) typical per board (analog output, relay output, communications) |
| General | |
| Programming Methods | Four front panel buttons or via Laurel's free Instrument Setup Software, which runs on a PC under MS Windows. |
| Security | Lockout options include using the front panel buttons, the free Instrument Setup Software, or a hardware jumper. |
| Warranty | 3 years parts & labor |
| Recalibration: All ranges are calibrated at the factory. Recalibration is recommended every 12 months. | |

|

|
| 1/8 DIN Digital Panel Meters | DIN Rail Transmitters |
Free Downloadable Windows-based Instrument Setup (IS) software (Data Interface Board Required) for use with our programmable Digital Panel Meters, Scale Meters, Counters, Timers, Remote Displays, and Transmitters, are an easy method to set up Laureate 1/8 DIN digital panel meters, counters, timers, remote displays, and DIN-rail transmitters, as explained in the Instrument Setup Software Manual. Laureate 1/8 DIN instruments can also be set up from the front panel, as explained in their respective Owners Manuals. Instrument Setup software is of benefit whether or not the PC is connected to the instrument.
Set User Account Control (UAC) of MS Windows to "Never notifiy me" so that Instrument Setup Software can create directories. The UAC change screen can be reached as follows:

RJ11-to-DB9 cable with rear view of DB9 connector to PC

RS232 cable, meter to PC, P/N CBL01
Laureate 1/8 DIN Laureate instruments must be equipped with a serial communications board and be connected to the computer via a serial communications cable. The connection can be via RS232, RS485, USB or Ethernet. Following setup, the serial communications board may be removed from the instrument if desired. The wiring of the RS232 cable is illustrated above with end views of the two connectors.
Laureate LT Series transmitters come standard with a 3-wire serial interface, which can be jumpered for RS232 or RS485.
Laureate LTE Series transmitters come standard with an Ethernet interface.
Click on any of the reduced screens below for a full-size screen view, then click on the Back button of your browser to return to this page. The screens examples below are for a fully-loaded Series 2 Digital Panel Meter (DPM), which is connected to the PC via RS232. If the meter is a Series 1 meter (pre-2007), this is sensed by the software, and somewhat different screens are brought up. Please see Series 1 setup screens.


From the Main Menu, click on Readings if your PC is connected to the meter. A pull-down menu then offers three choices: List, Plot and Graph.


Maximum panel thickness: 4.5 mm (0.18")
Weight of base meter: 210 g (7.4 oz) typical (DPM, counter, timer, 6-digit remote display)
Weight of option boards: 30 g (1.0 oz) typical per board (analog output, relay output, communications)
Tightening Torque - Connectors: Screw terminal connectors: 5 lb-in (0.56 Nm)
Tightening Torque - Pawls: Digital Panel Meter Case Pawls: 5 lb-in (0.56 Nm)
Dimensioned CAD assembly drawings in EPRT, STEP, x_t. dwg, pdf file formats: Laureate-meter-case.zip (zipping prevents browser from opening CAD files as text files).
 Slide the meter into a 45 x 92 mm 1/8 DIN panel cutout. Ensure that the provided gasket is in place between the front of the panel and the back of the meter bezel.
The meter is secured by two pawls, each held by a screw, as illustrated. Turning each screw counterclockwise extends the pawl outward from the case and behind the panel. Turning each screw clockwise further tightens it against the panel to secure the meter.
Slide the meter into a 45 x 92 mm 1/8 DIN panel cutout. Ensure that the provided gasket is in place between the front of the panel and the back of the meter bezel.
The meter is secured by two pawls, each held by a screw, as illustrated. Turning each screw counterclockwise extends the pawl outward from the case and behind the panel. Turning each screw clockwise further tightens it against the panel to secure the meter.
Turning each screw counterclockwise loosens the pawl and retracts it into its well. This position allows installed meter to be removed from their panel, or new meters to be installed in a panel. Do not remove the screws from their pawls. Doing so would cause the screw and pawl to fall off and likely get lost. Do not overtighten so as not to damage the plastic parts.
| Stopwatch Mode | |
|---|---|
|
The stopwatch mode is used to time single events to one microsecond resolution between start and stop pulses on the same channel. The width of a single waveshape can be measured by tying the A and B channels together. |
| Timing Process Dynamics | |
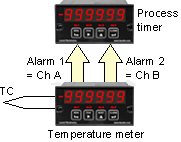 |
The start and stop pulses used for timing can be generated by the dual relay board in a Laureate analog panel meter or digital counter. For instance, the start and stop pulse edges can be created as temperature passes two alarm setpoints, or as temperature cycles in a hysteresis control mode. |
| Rate Based on 1 / Time | |
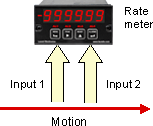 |
The Extended stopwatch meter can be programmed to display highly accurate rate or speed based on time. For example photodetectors on Channels A and B can provide timing pulses as a fast-moving object breaks two light beams, and the meter can then display speed in engineering units such as ft/sec or m/sec. The display will be held until reset by an external control input. |
| Replacing an Oscilloscope with a Laureate Meter | |
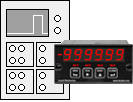 |
An oscilloscope is great for viewing and timing pulses in a lab. However, in fixed installations where digital timing accuracy and control outputs are required, a low-cost Laureate time interval meter will be the instrument of choice. Resolution to 0.2 µs is feasible. |
| Instrumenting a Pulsed Laser System | |
 |
|
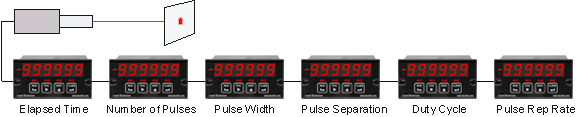
| Some of the many possibilities in instrumenting a pulsed laser system with Laureate dual-channel counters: elapsed time, number of pulses, pulse width, pulse separation, duty cycle, and pulse rep rate. | |
CAL-Digital
Certificate of Calibration
$65.00DLS-XLOG2
XLog2 Data logging Software
$495.00IPC
Digital Panel Meter Splashproof Cover
$55.00CASE1
Digital Panel Meter Benchtop Case1
$150.00CASE2
Digital Panel Meter Benchtop Case2
$150.00BOX1
DPM Enclosure Nema-4x Box1
$180.00BOX2
DPM Enclosure Nema-4x BOX2
$230.00CON01
CON01 Connector
$75.00CBL6
6-foot Power Cable
$41.00CBL12
12-foot Power Cable
$47.00CBL01
RS232 Cable for Meters
$35.00CBL02
USB-to-RS232 Adapter Cable
$47.00CBL04
RS232 Cable for LT Transmitters
$47.00CBL05
USB Data Cable for Meters
$47.00CBL06
USB-to-RS485 Adapter Cable
$47.00CBL07
USB Programming & Data Cable
$47.00CBL08
RS485 Splitter Cable
$33.00In industrial and laboratory environments, precision and reliability are paramount. Digital Panel Meters play crucial roles in providing accurate readings and real-time monitoring of various parameters. Among these devices, 1/8 DIN Digital Panel Meters stand out for their compact size and versatility. When paired with 6-digit digital stopwatch and timer functionality, these Digital Panel Meters offer powerful solutions for time-based measurements.
1/8 DIN Digital Panel Meters are types of instruments used for displaying numerical data in a variety of settings, including industrial, laboratory, and commercial environments. The term "1/8 DIN" refers to the Digital Panel Meters' size, which complies with the DIN (Deutsches Institut für Normung) standard for panel-mounted instruments. Specifically, 1/8 DIN Digital Panel Meters have dimensions of 96mm x 48mm, making them compact and easy to integrate into control panels.
These Digital Panel Meters are designed to display various types of measurements such as voltage, current, temperature, pressure, or, in this case, time. The digital aspect signifies that the readings are shown in numerical form on LED or LCD displays, offering precision and ease of reading.
6-digit digital stopwatch and timer functionality is designed to measure and display time intervals with high precision. The six-digit displays allow the Digital Panel Meters to show time in formats that could range from hours, minutes, and seconds to fractions of a second, depending on the application. This high resolution makes them ideal for applications where precise timing is essential, such as in laboratories, testing facilities, or industrial processes.
These stopwatch and timer functions are often used in scenarios that require strict time tracking, like testing the response time of systems, measuring elapsed time during production processes, or monitoring time intervals in research experiments.
When these capabilities are combined, they create powerful tools for time measurement and monitoring. 1/8 DIN Digital Panel Meters act as the display and control interfaces for the 6-digit digital stopwatch and timer functions. This integration allows users to view real-time data and control time-related functions directly from the Digital Panel Meters.
The combination of 1/8 DIN Digital Panel Meters with 6-digit digital stopwatch and timer functionality is widely used in various applications, including:
1/8 DIN Digital Panel Meters designed for 6-digit digital stopwatch and timer functionality are specialized devices commonly used in various industrial and commercial settings. Their primary function is to display time measurements with high precision, making them crucial components in processes where accurate timing is essential.
In manufacturing environments, timing is critical for ensuring the efficiency and accuracy of production processes. 1/8 DIN Digital Panel Meters integrated with stopwatch and timer functionality are often used to:
In laboratory settings, precise time measurement is crucial for experiments, testing, and calibration tasks. 1/8 DIN Digital Panel Meters are often used to:
Automation systems in various industries, including manufacturing, pharmaceuticals, and food processing, rely heavily on timing for efficient operations. Digital Panel Meters are used to:
In energy management systems, timing is crucial for monitoring and controlling energy usage. The Digital Panel Meters are often used to:
In the transportation and logistics sectors, timing is essential for tracking and managing the movement of goods and vehicles. 1/8 DIN Digital Panel Meters are used to:
In healthcare settings, precise timing is critical for various procedures and the operation of medical equipment. Digital Panel Meters are used to:
1/8 DIN Digital Panel Meters for 6-digit digital stopwatch and timer functionality are versatile devices used across multiple industries. Their ability to provide accurate and reliable time measurement makes them indispensable in environments where timing is critical to operations, safety, and quality control.
A 6-digit display allows an extra digit of resolution, which can be used for finer time increments (such as hundredths or thousandths of a second) or for tracking longer elapsed times before the display needs to roll over, depending on how the decimal point and scaling are configured.
An on-delay timer starts its count when triggered and activates its output only after the preset time elapses. An off-delay timer keeps its output active immediately upon trigger, but delays turning that output off for the preset time after the trigger condition ends. Which type is needed depends on whether the delay should happen before or after the triggering event.
A retriggerable timer restarts its full time count from zero each time it receives a new trigger pulse, even before the previous count finishes — useful for applications where each new event should reset the clock. A non-retriggerable timer ignores additional triggers until its current count completes, which matters for applications where only the first trigger in a sequence should count.
Many 1/8 DIN timer meters support both modes — counting up from zero to track elapsed time, or counting down from a preset value to trigger an action when it reaches zero — with the specific mode selected in configuration depending on the application.
Timing accuracy varies by model and is generally very good for short-to-moderate durations, but like any electronic timing device, accuracy and drift over very long periods (many hours to days) should be checked against the manufacturer's specification if the application requires long-duration precision.
Yes, these meters commonly support programmable relay outputs tied to the timer reaching its preset value, allowing the meter to trigger an alarm, start or stop other equipment, or signal a process step change once the timed interval completes.
Many models store the current count in non-volatile memory, so a timer in progress can potentially resume rather than reset entirely after a power interruption, though the specific recovery behavior should be confirmed against the model's documentation for critical timing applications.
Yes, many models support external contact closure inputs or communications commands to start, stop, and reset the timer, in addition to front-panel pushbutton control, which is useful for integrating the timer into an automated sequence controlled by a PLC.
These meters commonly support serial communications such as RS-232 or RS-485, allowing elapsed time, cycle counts, or timer status to be reported to a PLC, SCADA system, or data logging platform rather than being read only locally.
Yes, most models offer configurable display formatting so time can be shown in whatever format best suits the application — total elapsed seconds, or a broken-out hours:minutes:seconds format — depending on operator preference and the duration typically being measured.
This has been documented as a recurring, if easily overlooked, characteristic of software-based timers — a timer implemented in a device that processes on a scan or update cycle doesn't complete at exactly the preset value, but rather at the first update cycle where the elapsed time meets or exceeds the preset, which introduces a small, consistent timing error on every cycle proportional to the update interval.
This is a documented effect of the same underlying scan-cycle rounding issue — since each individual timer can complete slightly late relative to its preset, cascading two timers compounds both timers' individual rounding error into the combined total, producing more overall drift than either timer would show independently. Reducing each timer's preset slightly to compensate, or using a single longer timer instead of two cascaded shorter ones, are both used to reduce this compounding effect.
This has been reported as a genuine field issue with individual timer relay units, and one commonly cited contributing factor is component-level thermal sensitivity — a unit running warmer than its neighbors (due to heavier loading, poor ventilation, or a marginal connection generating extra heat) can drift differently even when all units are nominally identical and correctly programmed. Comparing the operating environment and loading of the drifting unit against the others that aren't drifting is a reasonable troubleshooting step.
This distinction matters for correct wiring and application, and it isn't standardized across all timer devices — some units begin their timing cycle automatically the moment power is applied, while others require a distinct start/trigger input separate from the power supply. Checking the specific unit's timing diagram in its documentation, rather than assuming a wiring convention shared with a different timer model, is the recommended way to avoid application mistakes.
This has come up in real troubleshooting discussions where a timer's internal reference clock was independently verified as accurate, yet the actual programmed timing sequence still drifted — pointing toward the timing logic or sequence configuration itself, rather than the underlying clock, as the source of the discrepancy. This distinction (clock accuracy vs. programmed sequence accuracy) is worth separating out early in troubleshooting rather than assuming a drifting sequence always means a bad internal clock.
Yes, this has been reported as a real-world nuisance issue — a small leakage current through a connected indicator light or other low-current load can be enough to keep a lightly-loaded output faintly energized or lit even when the timer output is technically off, particularly if the connected load's minimum operating current is very low. Checking the load's minimum current requirement against the relay or output's leakage specification helps identify whether this is the cause of an unexpected faint glow or minor unwanted activation.
Field guidance is consistent on this point: standard software timers in a general-purpose PLC are not considered adequate for primary safety functions such as emergency-stop timing or safety light curtain delays, since standard PLC software can lock up or fail in ways that a certified safety relay or safety-rated PLC is specifically designed to avoid. Safety-critical timing delays should use hardwired safety timer relays or certified safety controllers rather than general-purpose logic timers.
Beyond the per-timer rounding error already discussed, this can also be affected by how a timer is retriggered in software — restarting a timer by watching for its own "done" condition to go false, rather than through a dedicated reset instruction, can add up to a full extra processing cycle of delay on every restart, since the done condition doesn't clear instantaneously. Reviewing exactly how each timer in a cascaded sequence is being restarted, not just its preset values, helps account for unexpected extra total delay.


